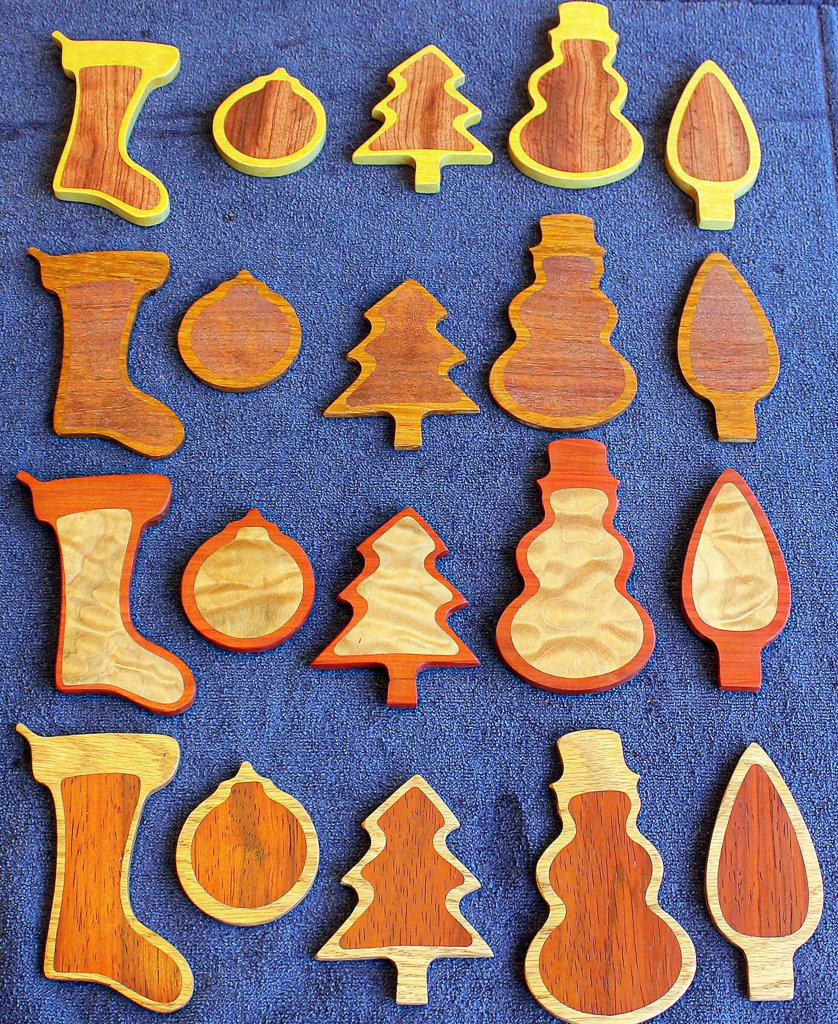
 $60
$60FREE SHIPPING
We only ship in the US
Stocking Dimensions: 5" Tall, 3" Wide

Click twice to play
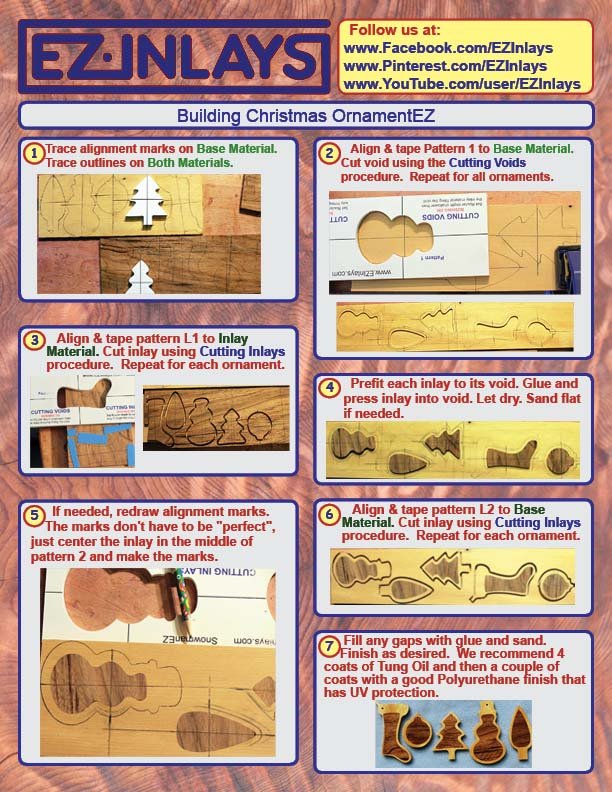
The first step in building the Christmas Ornaments is to select your materials. The base material, or the outer portion of the ornament, can be built either horizontally or vertically. If building them vertically the base material needs to be 12" X 5 1/2" by 1/4" thick. If orienting the ornaments horizontally then the base material needs to be 24" X 3 1/2" X 1/4" thick. Both orientations are represented in the video.
We recommend the base material be at least 1/4" thick but not much more than 3/8" thick. Much thinner then the ornament will tend to warp and be somewhat fragile. If the base material is over 3/8" thick you will have a difficult time cutting out the ornament with a plunge router.
For the inlay material if you're using a horizontal grain pattern the material should be 20" X 3" X 1/8". If using a vertical grain pattern orientation then the material should be 12" X 4" X 1/8". Remember it's best to have your inlay material be no more than half as thick as the base material. Also, to help prevent warping over time, it's best to have one grain pattern going vertically and the other horizontally. This is not a hard and fast rule however, choose the grain directions that look best to you!
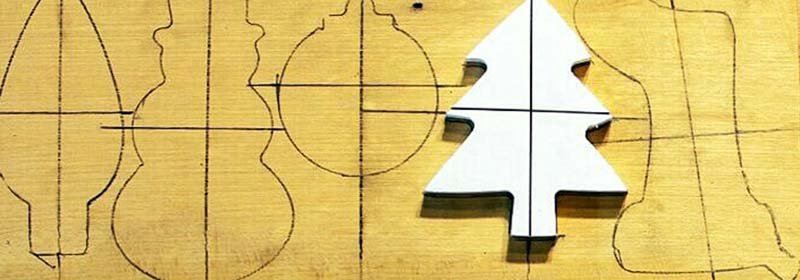
Position the Pattern 2 shape of the ornament on the base material. trace out the entire shape of the ornament and add the notches where the alignment marks will go. After the outline of the ornament is complete use the edge of the template to extend the alignment marks. Repeat this process for all of the templates. At the end of the process you should have something like this:
Click twice to play
You need to set the depth of plunge on your specific plunge router to cut out a void this is as thick as the inlay material but not so deep that it cuts all the way through the base material. Each plunge router is different so check your routers manual if unsure how to set the depth. Because you're going to be cutting a void you need to put the BUSHING ON the brass inlay kit.
To set the depth of plunge we recommend turning the plunge router over, placing a template on the base of the router, and then placing the inlay material on top of the template. Then run your finger over the material and router bit. If the bit protrudes above the material the depth of cut is too deep so you need to back it off. If you can't feel the bit at all you may need to increase the depth of plunge. If you can barely feel the bit your router is set correctly
WARNING!!! Never set the depth of plunge to be deeper than the thickness of the base material!
Click twice to play
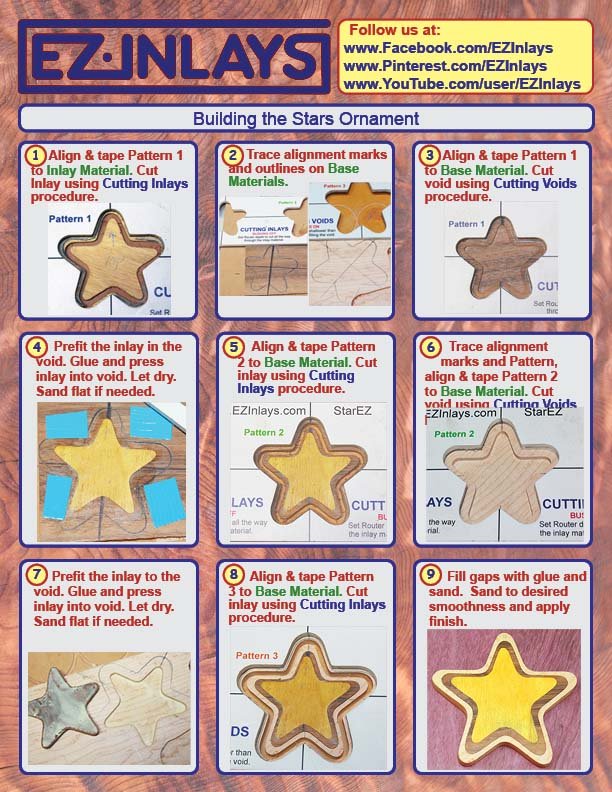
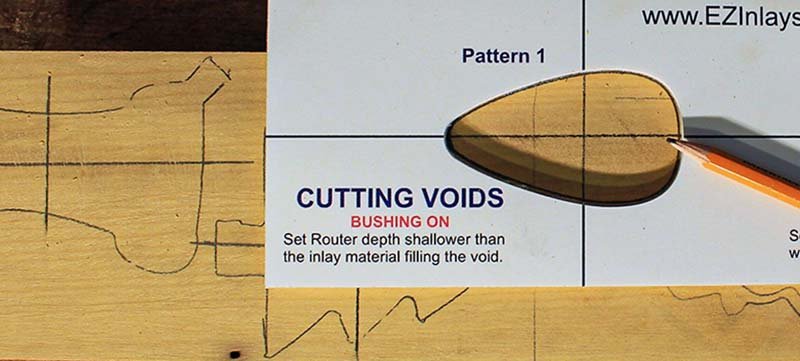
To cut the voids you need to position Pattern 1, for the ornament being cut out, over the alignment marks. It's a great idea to align the template and trace out the shape that will be getting routed out. This will help you place the double sided tape on the inlay material to keep the template from moving during the routing process.
You trace out the shape being cut so you know where not to place the double sided tape. You want to hold the template securely against the inlay material but you don't want any tape inside the shape being cut out. If there is tape in there it will catch debris making it more difficult to cut a clean void. You also don't need to place outside the template itself because it won't do anything, well other than wast tape!
After the tape is applied, align the template in the cross hairs and firmly push it down against the tape. Once the template is in place secure the entire assembly to the workbench using quick release clamps. Make sure the clamp heads do not interfere with the router base. If the base hits the clamp then the bearing won't be able to stay in constant contact with the template wall. If this happens your void will be malformed.
To route the void place the router over the shape being cut out. Slide the bushing over against the side wall of the template. Turn the router on and plunge it into the material. Make a pass around the perimeter of the shape, then move the router back and forth over the remaining material. It's best to route the void using two passes. The first pass is to remove the majority of the material. After the first pass is cut use a shop vac to clear out the debris.
For the second pass place the router over the shape, turn it on, and plunge it down. Keep the bushing in constant contact with the template wall and make a complete pass around the shape. Doing this will ensure you have nice sharp edges for your inlay to fit into. After the edges are cleaned up move the router back and forth over those area that still has material to be removed.
When finished your void should look something like this: 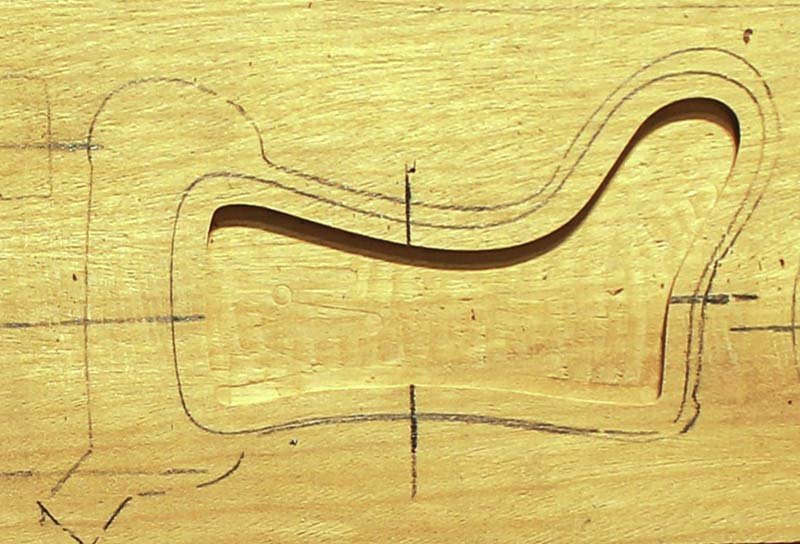 .
.
Repeat the process for all of the voids for the ornaments you're building.
Click twice to play
Prepare to route the inlay pieces by selecting where you want to take each piece from. Slide the template over the material until you find a grain pattern you like. When selecting your pieces make sure you're using the same grain direction for all of the inlay pieces. If some of them have a vertical grain pattern and other a horizontal pattern they won't look like they belong together.
As you make each selection trace the outline of the Pattern 1 shape on the inlay material. For this step you don't need to worry about alignment marks.
Affix the template to the inlay material by applying double sided tape to the material around the drawn out shape. Remember don't put tape in the area being cut out or outside the shape of the template itself. Once the tape is applied press the template into place and clamp the assembly to the work bench. Check the distance between the router base and the clamp head. When cutting voids if the router hit the clamp it wasn't a big deal because you could just move the clamp and keep routing out the material. Cutting an inlay is a different animal! If the router base hits a clamp during the cutting process your inlay piece will be ruined and you'll need to cut out another one.
Prepare the router by setting the depth of plunge to cut all the way through the inlay material. Plunge the router down, flip it over, place a template on the base, and place the inlay material on the base. If your inlay material is already taped to a board find another piece of wood that is the same thickness and use it as a guide. This time you'll want to be able to feel the router bit when you run your finger over the wood material. Don't make the depth of plunge to deep though because the deeper you go into the backing material the more difficult the cut.
Because you're cutting an inlay you need to take the BUSHING OFF the brass inlay kit.
To route the inlay position the router in the shape to be cut out, slide the bearing against the template wall, turn the router on, and plunge it into the material. You will make one complete pass around the perimeter of the shape keeping the bearing in constant contact with the template wall. Repeat the process for all of the voids for the ornaments you're building.
When finished your inlays should look something like this: 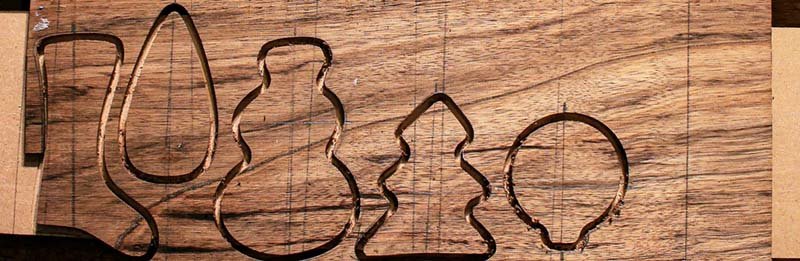 .
.
Click twice to play
After cutting out the inlay pieces use a paint scraper and carefully remove them from the backing material. Remember they're held in place with double sided tape and are now somewhat fragile due to their size. Chances are good that you'll need to do a quick sanding on the bottom of the inlay piece. This will remove and burrs and debris left over from the cutting process. When sanding DO NOT sand the top edge of the inlay piece or else you'll introduce gaps into the inlay.
Prefit each inlay into it's void. Don't push it to far into the void or else it will be a drag getting it back out. The purpose of prefitting is to see if you need to sand the edge of the inlay piece or not. If you do need to sand put a slight bevel on the bottom of the piece and sand the edges lightly to remove any left over debris from the routing process.
After the piece is fitted to it's void smear glue on both the bottom of the inlay piece and in the void it will be set into. Place the inlay into it's void and I like to use a soft mallet to tape the piece into place until fully seated.
Depending on the thickness of the inlay material and the depth of void you may have to do some sanding prior to cutting out the ornaments. If you do this take care not to erase the alignment marks!!! If sanding it's always a good idea to extend the alignment marks away from the ornament so they can be recreated if needed. The inlay doesn't have to completely flat at this point but it needs to be flat enough so the inlaid material doesn't interfere with the router bearing when cutting out the ornament as an inlay.
When finished your inlays should look something like this: 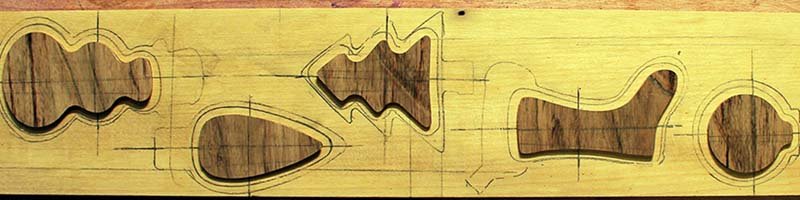 .
.
Click twice to play
Now it's time to cut out each ornament as an inlay. Use the same procedure you used earlier to adjust the depth of cut so it cuts all the way through the inlay material. Because you're cutting an inlay you need to take the BUSHING OFF the brass inlay kit.
Using the alignment marks position the Pattern 2 and affix the template to the inlay material using the same procedures as before. After the templates are affixed, clamp the entire assembly to the workbench.
Ensure the router base does not hit a clamp during the cutting process or else your ornament will be ruined. The best way to do this is to position the router inside the void, after the template is affixed and the assembly clamped to the work bench, and move it around the perimeter of the shape. If you hit a clamp adjust it's position before routing out the inlay.
Depending on the thickness of the ornament itself you may want to cut out the inlay using two passes. If your material is over 1/4" thick I would recommend making one pass with the router only plunged half way through the material. After the first pass is complete clean out the debris, and then make the final pass cutting out the inlay. On the final pass plunge the router all the way through the material. You can safely do this because the template is still affixed in place.
If you cut out an inlay, but didn't cut all the way through the material, removing the template will cause all sorts of grief. If that happens you can try to replace the template but the chances are slim you'll position it exactly in the same position as before. The other option is to sand the back side of the inlay until the cut lines appear. It's much netter to check to see if you cut all the way through the material prior to taking the template off!
After cutting out all of the ornaments remove the excess base material leaving the ornaments in place. It's easier to sand the ornament when they are still held against the backing material with double sided tape. I recommend using 220 grit sandpaper and sanding the top of the inlay until all tool and pencil marks are removed. I like to think of the sanding process as using an eraser to eliminate the flaws in the wood I don't want to see. The picture below doesn't represent this however, because I just ran the ornaments through a drum sander and didn't take a picture after I did the final sanding with my RO sander using 200 grit sandpaper.
When finished your ornaments should look something like this: 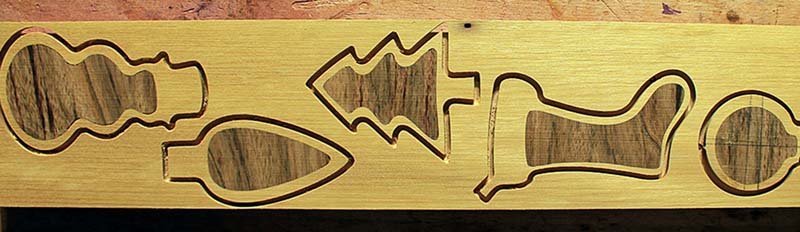 .
.
Click twice to play
With the ornaments still affixed to the backing material fix any gaps in the ornaments. To do this just smear a small amount of glue into the gap, wipe off the excess glue, then sand over the area. The sanding action will cause sawdust to mix with the glue in the gap blurring it out.
After all the gaps have been filled carefully pry each ornament off the backing material. I recommend putting gloves on for this process because sometime the paint scraper can slip and jam into your hand.
With the ornaments free sand the back and the side of the ornament to remove tool marks. I like to do a slight sanding on the edge of the ornament to soften up the edges too. For this process I use 320 grit sandpaper and sand it by hand. You can use an RO sander for this process but sometimes it will remove more material than you want, especially when working with a soft wood like Yellow Heart.
Once your ornaments are sanded to your satisfaction apply finish to them. Personally I like to apply three coats of Tung Oil followed by a polyurethane finish that has a UV inhibitor in it. The UV protection will help keep the woods used in your ornament from changing color over time.
Always follow the instructions of the finish you're using to complete your ornaments. A good rule of thumb for Tung Oil is to hand rub in a coat, wait at least 8 hours for the coat to dry, rub in a second coat and let it dry too. Do this one more time and after the third coat is applied let the oil dry for two days or more. Once the Tung Oil is completely dry apply the poly finish. The finish I use has a dry time of two to three hours so I apply a coat, wait a few hours, apply a second coat, wait a few more hours and then apply the final coating.
That's it, you're finished and now you've got some amazing hand built ornament that will gracefully adorn your Christmas Tree for decades to come!
When finished your ornaments should look something like this:  .
.
 or
or